Sneak Peak
“Yoga Poses to Prevent Back Pain” Are you struggling with back pain? Yoga might be what you need. This mind-body practice not only helps with back pain but also reduces the stress that comes with it. By doing the right yoga poses, you can relax and strengthen your muscles.
Why it’s helps
Yoga combines gentle movements, stretching, and breathing exercises. Practising yoga can help you become more aware of your body. This awareness helps you notice where you feel tension and where your body is out of balance. With regular practice, you can bring your body back into balance and feel better .
How Yoga Helps with Back Pain
Practicing yoga for a few minutes each day can help you understand your body better. You’ll learn to feel where you hold tension and where your body is out of alignment. This understanding helps you make adjustments and bring your body back into balance.
Practicing these poses can strengthen your back muscles. It can also reduce tension. This can lead to less pain and more comfort in your daily life.
Getting Started
If you’re new to yoga, take it slow and listen to your body. It’s important to move and avoid any poses that cause pain. You might also consider joining a yoga class. Or, you could follow a video guide to ensure you’re doing the poses right.
Remember, yoga is about progress, not perfection. With regular practice, you’ll likely find your back pain decreases. Your sense of well-being will improve.
Keep practicing and enjoy the journey to a healthier, more balanced you!
1. Cat-Cow Pose: Yoga Poses to Prevent Back Pain
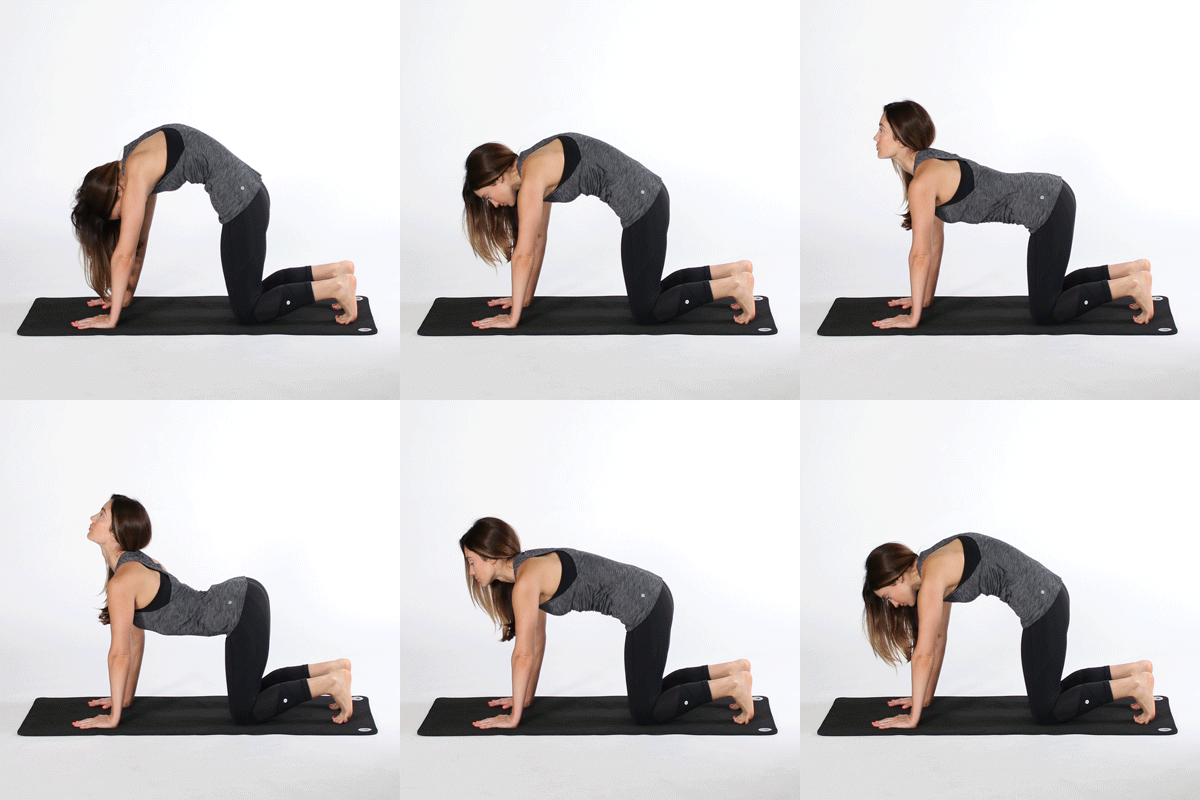
The Cat-Cow Pose is a gentle yoga movement that helps stretch and mobilize your spine. This pose also stretches your torso, shoulders, and neck. It’s a great way to warm up and release tension.
Muscles Worked
When you do the Cat-Cow Pose, you’ve worked several important muscles, including:
- Erector Spinae: These muscles run along your spine and help you to bend and straighten your back.
- Rectus Abdominis: This is your “six-pack” muscle in your abdomen.
- Triceps: The muscles at the back of your upper arms.
- Serratus Anterior: These muscles, located on the side of your chest, help to move your shoulder blades.
- Gluteus Maximus: The large muscles in your buttocks.
How to Do the Cat-Cow Pose
- Get on All Fours: Start by getting down on your hands and knees. Make sure your hands are under your shoulders. Your knees should be under your hips.
- Balance Your Weight: Distribute your weight across your hands and knees. This helps you stay steady during the movement.
- Inhale and look up: As you breathe in, lift your head and look up. At the same time, let your stomach drop down towards the mat. This is the “Cow” part of the pose.
- Exhale and arch your spine: As you breathe out, tuck your chin into your chest and pull your belly button towards your spine. Round your back towards the ceiling. This is the “Cat” part of the pose.
- Stay Aware of Your Body: As you move between Cat and Cow, pay attention to your body. Notice any areas where you feel tension and try to relax those areas.
- Continue the Movement: Keep flowing between Cat and Cow for at least one minute. Move slow and gently, matching your movements to your breath. Yoga Poses to Prevent Back Pain
Why Cat-Cow is beneficial.
Practicing the Cat-Cow Pose helps improve the flexibility and mobility of your spine. It also stretches your torso, shoulders, and neck. This can help release tension in these areas. Also, this movement encourages you to focus on breathing and body awareness. It promotes relaxation and mindfulness.
Remember, yoga is about listening to your body and moving at your own pace. Enjoy the soothing, rhythmic motion of the Cat-Cow Pose as it helps you feel more relaxed and aligned.
You May Also Like:
Unlock Your Potential with Powerful Yoga Sequences 2024
2. Downward-Facing Dog: It’s a Restful and Rejuvenating Pose
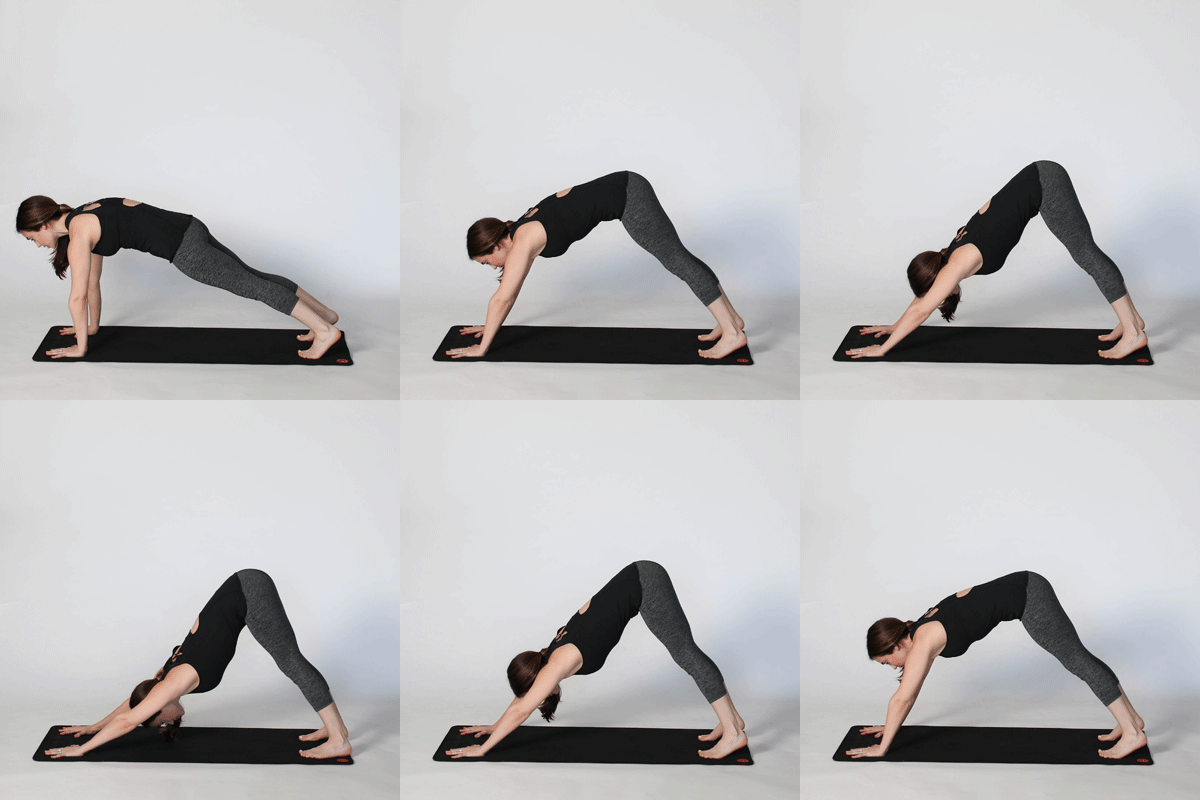
Downward-Facing Dog is a classic yoga pose that can be both restful and invigorating. Doing this pose can relieve back pain and sciatica. It can also balance out body imbalances and improve strength.
Muscles Worked
When you do the Downward-Facing Dog Pose, you’ve worked several key muscles, including:
- Hamstrings: The muscles at the back of your thighs.
- Deltoids: The muscles in your shoulders.
- Gluteus Maximus: The large muscles in your buttocks.
- Triceps: The muscles at the back of your upper arms.
- Quadriceps: The muscles at the front of your thighs.
How to Do the Downward-Facing Dog Pose
- Start on all fours: Begin by getting down on your hands and knees. Make sure your hands are under your shoulders. And, your knees are under your hips.
- Position Your Hands and Feet: Spread your fingers wide and press your hands into the mat. Tuck your toes under and get ready to lift your knees.
- Lift Your Knees: Press into your hands. Lift your knees off the ground and straighten your legs as much as you can without locking them. Your body should form an upside-down V shape.
- Raise Your Hips: Push your sitting bones up toward the ceiling. This helps to lengthen your spine and tailbone.
- Slight Bend in Knees: Keep a slight bend in your knees to avoid straining your lower back and to help maintain the length in your spine.
- Heel Position: It’s okay if your heels don’t touch the ground. Keep them lifted. Focus on the stretch, not forcing your heels down.
- Distribute Your Weight: Ensure that you distribute your weight between your hands and feet. Pay attention to your hips and shoulders to ensure they are balanced.
- Align Your Head: Keep your head in line with your upper arms, or tuck your chin in slightly to avoid straining your neck.
- Hold the Pose: Stay in this position for up to one minute. Keep breathing deeply and evenly, focusing on the stretch and the alignment of your body.
Benefits of downward-facing dog.
Downward-Facing Dog is a powerful pose. It stretches and strengthens many parts of your body. It helps to relieve back pain by lengthening the spine. It can ease sciatica by stretching the hamstrings and calves. This pose also helps balance out muscle imbalances and improves body strength.
Remember, yoga is about listening to your body and moving at your own pace. Enjoy the restorative and rejuvenating effects of the Downward-Facing Dog Pose. It helps you feel more balanced and strong.
You May Also Like:
Top 11 Hatha Yoga Asanas to Ease Stress and Anxiety
3. Extended Triangle Pose: A Classic Standing Posture
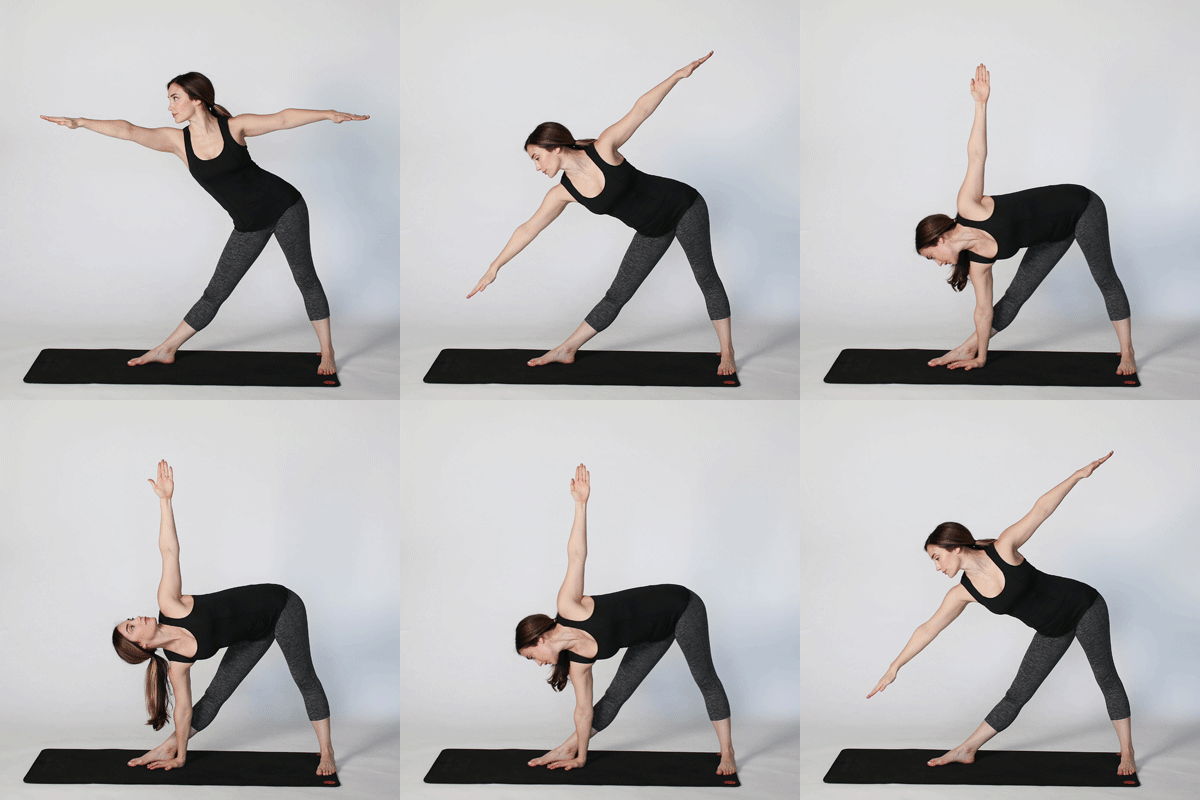
Extended Triangle Pose is a traditional yoga pose. It can ease backache, sciatica, and neck pain. This pose stretches your spine, hips, and groin. It also strengthens your shoulders, chest, and legs. Additionally, it may help relieve stress and anxiety.
Muscles Worked
When you’ve practiced Extended Triangle Pose, you engage several important muscles, including:
- Latissimus Dorsi: The large muscles on the sides of your back.
- Internal Oblique: The muscles on the sides of your abdomen.
- Gluteus Maximus and Medius: The muscles in your buttocks.
- Hamstrings: The muscles at the back of your thighs.
- Quadriceps: The muscles at the front of your thighs.
How to Do the Extended Triangle Pose
- Start standing: Begin by standing tall with your feet together and your arms at your sides.
- Step your feet apart: Position your feet about 4 feet apart on the ground.
- Position Your Toes: Turn your right toes to face forward and your left toes out at a slight angle.
- Lift Your Arms: Raise your arms parallel to the floor with your palms facing down, creating a T-shape with your body.
- Tilt Forward: Slowly tilt your body forward from your hips, not your waist, reaching your right arm forward.
- Hinge at Your Hip: Bend at your right hip. Bring your right hand down to rest on your leg, a yoga block, or the floor, depending on your flexibility.
- Extend Your Left Arm: Extend your left arm up toward the ceiling, creating a straight line from your left hand to your right hand.
- Adjust Your Gaze: You can look up at your left hand, look forward, or look down at your right foot. Do what feels comfortable for your neck.
- Hold the Pose: Stay in this position for up to one minute, breathing deeply and evenly. Focus on keeping your body aligned and stretching through your spine.
- Repeat on the Other Side: Come back up to standing slowly. Then, repeat the pose on the other side. Turn your left toes forward and your right toes out at an angle.
Benefits of Extended Triangle Pose
The Extended Triangle Pose offers a variety of benefits. It helps to stretch and strengthen different parts of your body. These include your spine, hips, groin, shoulders, chest, and legs. This pose can also reduce back pain, sciatica, and neck pain. Furthermore, it promotes relaxation and can reduce stress and anxiety.
Remember, yoga is a journey, and each pose helps you understand and connect with your body better. Enjoy the stretch and strength of the Extended Triangle Pose. It helps you feel more balanced and calm.
You May Also Like:
8 Powerful Hatha Yoga Poses for Beginners
4. Cobra Pose: A Gentle Backbend
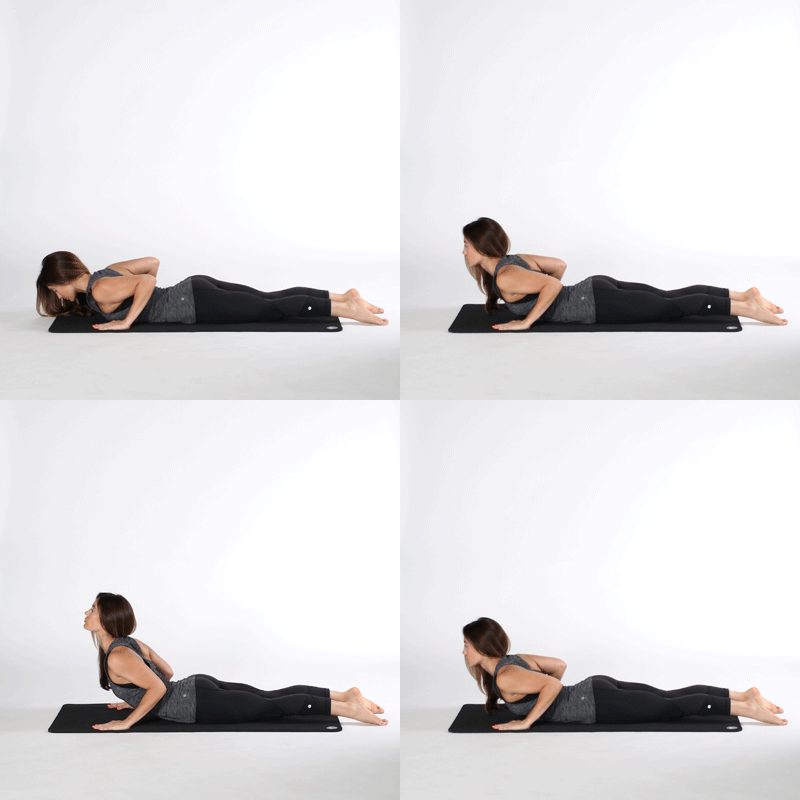
The Cobra Pose is a gentle yoga posture that helps stretch your abdomen, chest, and shoulders. It strengthens your spine. It can soothe sciatica, and give relief from the stress and fatigue of back pain.
Muscles Worked
When you’ve practiced the Cobra Pose, you engage several important muscles, including:
- Hamstrings: Muscles at the back of your thighs.
- Gluteus Maximus:The large muscles in your buttocks.
- Deltoids: Muscles around your shoulders.
- Triceps: Muscles at the back of your upper arms.
- Serratus Anterior: Muscles along your rib cage.
How to Do the Cobra Pose
- Lie on your stomach: Start by lying face down on your mat with your legs extended straight behind you. Keep your feet together and your toes pointed.
- Position Your Hands: Place your hands under your shoulders with your fingers facing forward. Draw your elbows in close to your sides. Avoid letting them stick out to the sides.
- Engage Your Core: Activate the muscles in your abdomen and lower back to support your spine as you move into the pose.
- Lift Your Upper Body: Press firmly into your hands to slowly lift your head, chest, and shoulders off the ground. You can choose to lift partway, halfway, or all the way up, depending on what feels comfortable for you.
- Bend Your Elbows Slightly: Keep a slight bend in your elbows to avoid locking them. This helps protect your joints and maintains muscle engagement.
- Optional Head Drop: If it feels good, you can gently let your head drop back to deepen the stretch in your chest and shoulders.
- Lower back down: On an exhale, slowly release back down to your mat. Move with control to avoid straining your back.
- Rest and Release Tension: Bring your arms by your sides and rest your head on the mat. Slowly move your hips from side to side to release any tension in your lower back.
Benefits of Cobra Pose
Practicing the Cobra Pose can help stretch and strengthen your back muscles. It can also relieve tension and make your spine more flexible. It also helps to open up your chest and shoulders, which can be very relaxing.
Take your time with this pose and listen to your body. With regular practice, you’ll find it can greatly reduce back pain. It also promotes calm and relaxation.
5. Locust Pose: Strengthen and Relieve
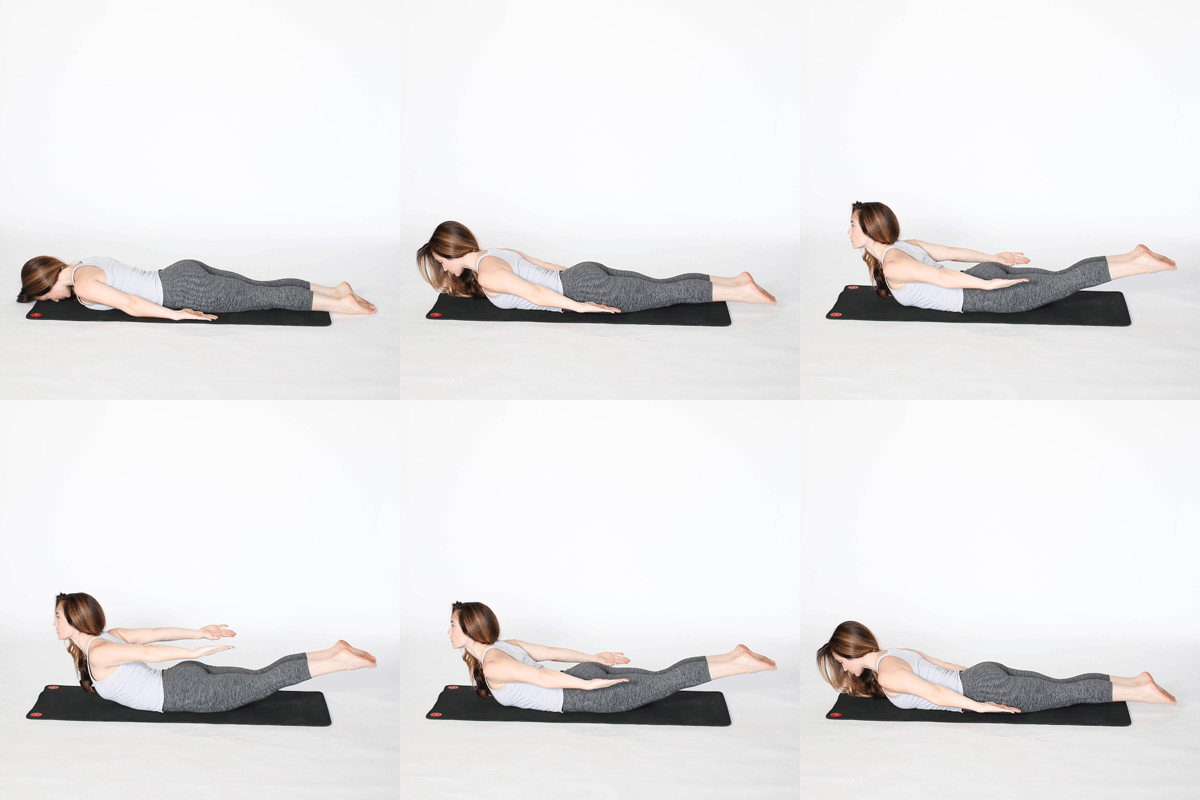
The Locust Pose is a gentle backbend that can help relieve lower back pain and fatigue. It strengthens your back torso, arms, and legs, making it a great addition to your yoga routine.
Muscles Worked
When you practice the Locust Pose, you’ve engaged several key muscles, including:
- Trapezius: Muscles along your upper back.
- Erector Spinae: Muscles that run along your spine.
- Gluteus Maximus: The large muscles in your buttocks.
- Triceps: Muscles at the back of your upper arms.
How to Do the Locust Pose
- Lie on your stomach: Start by lying face down on your mat. Place your arms next to your torso with your palms facing up.
- Position Your Feet: Touch your big toes together and turn your heels out to the side. This helps to align your legs and hips.
- Place your forehead on the floor: Rest your forehead lightly on the mat to begin the pose.
- Lift Your Upper Body: Slowly lift your head, chest, and arms partway, halfway, or all the way up. You should feel a gentle stretch in your back.
- Interlace your fingers (optional): To deepen the pose, you can bring your hands together behind your back and interlace your fingers.
- Lift Your Legs (optional): For an extra challenge, you can lift your legs off the mat. Keep them straight and together.
- Lengthen Your Neck: Look straight ahead or slightly upward. This helps lengthen the back of your neck and maintain a good posture.
- Hold the Pose: Stay in this position for up to 1 minute, breathing steadily. Focus on engaging your muscles and keeping your body lifted.
- Rest and Repeat: Slowly lower your body back to the mat and rest. You can repeat the pose if desired.
Benefits of Locust Pose.
The Locust Pose is excellent for strengthening your back and improving posture. It helps relieve tension and fatigue in your lower back. Regular practice can lead to a stronger and more flexible spine.
Take your time with this pose and listen to your body. With patience and practice, you’ll find it can ease back pain and boost your strength.
6. Bridge Pose: A Restorative Backbend
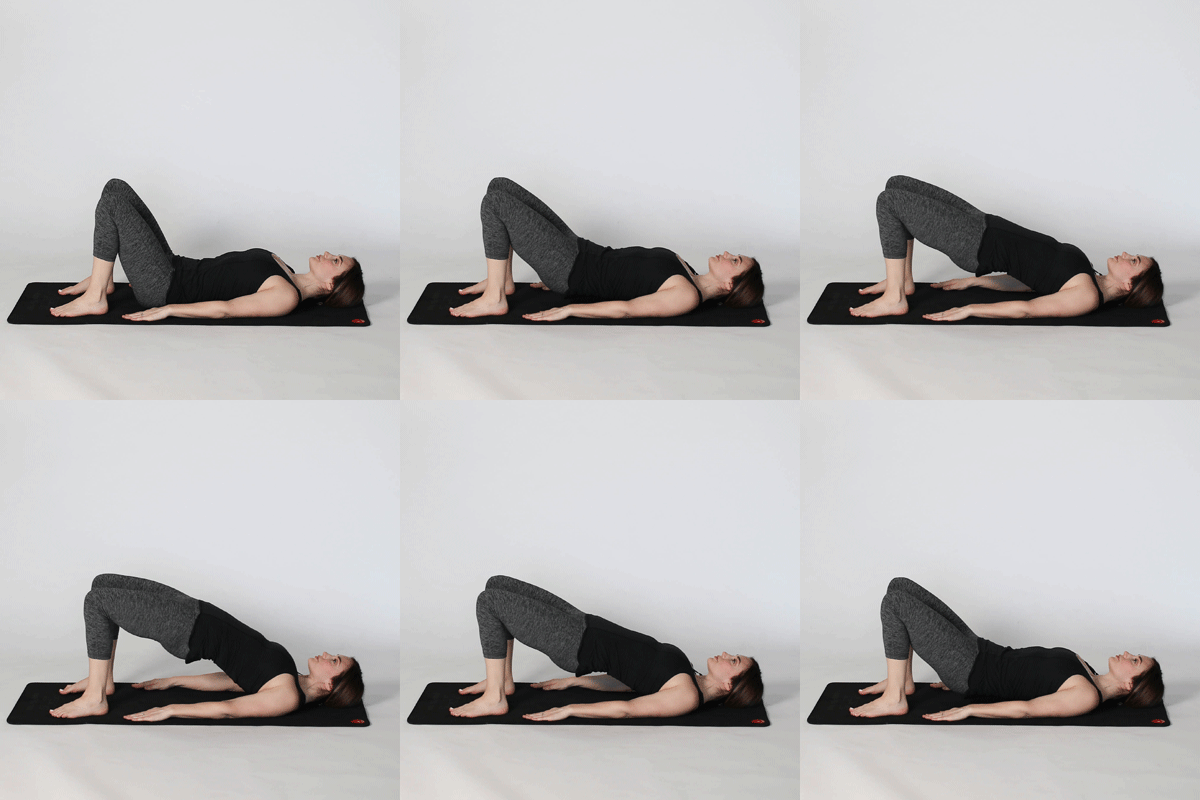
The Bridge Pose is a versatile backbend. It is also an inversion. It can be both stimulating and restorative. It stretches your spine, which may help relieve backaches and headaches.
Muscles Worked
When you practice the Bridge Pose, you engage several important muscles, including:
- Rectus and Transverse Abdominis: Core muscles that support your spine.
- Gluteus Muscles: The muscles in your buttocks.
- Erector Spinae: Muscles along your spine.
- Hamstrings: The muscles at the back of your thighs.
How to Do the Bridge Pose
- Lie on Your Back: Begin by lying flat on your back. Bend your knees and draw your heels close to your sitting bones.
- Position Your Arms: Rest your arms alongside your body with your palms facing down.
- Lift Your Tailbone: Press your feet and arms into the floor. Slowly lift your tailbone towards the ceiling.
- Raise Your Hips: Continue lifting until your thighs are parallel to the floor. Your chest should be moving towards your chin.
- Arm Positioning: You have options for your arms:
- Leave them alongside your body.
- Bring your palms together under your hips and interlace your fingers.
- Place your hands under your hips for extra support.
- Hold the Pose: Stay in this position for up to 1 minute. Keep breathing steadily, focusing on lifting your hips higher with each inhale.
- Release the Pose: To come out of the pose, slowly roll your spine back down to the floor, one vertebra at a time.
- Rest and Relax: Once you are back on the floor, drop your knees in together. Relax in this position and take deep, calming breaths.
Benefits of Bridge Pose
The Bridge Pose helps stretch and strengthen your back, glutes, and core. It can improve your posture, relieve tension, and reduce headaches and backaches. This pose also promotes relaxation and a sense of well-being.
Practice the Bridge Pose often. It can boost your flexibility and strengthen your back and legs. Remember to listen to your body and move gently, especially if you’re new to this pose.
7. Half Lord of the Fishes Pose: A Revitalizing Twist
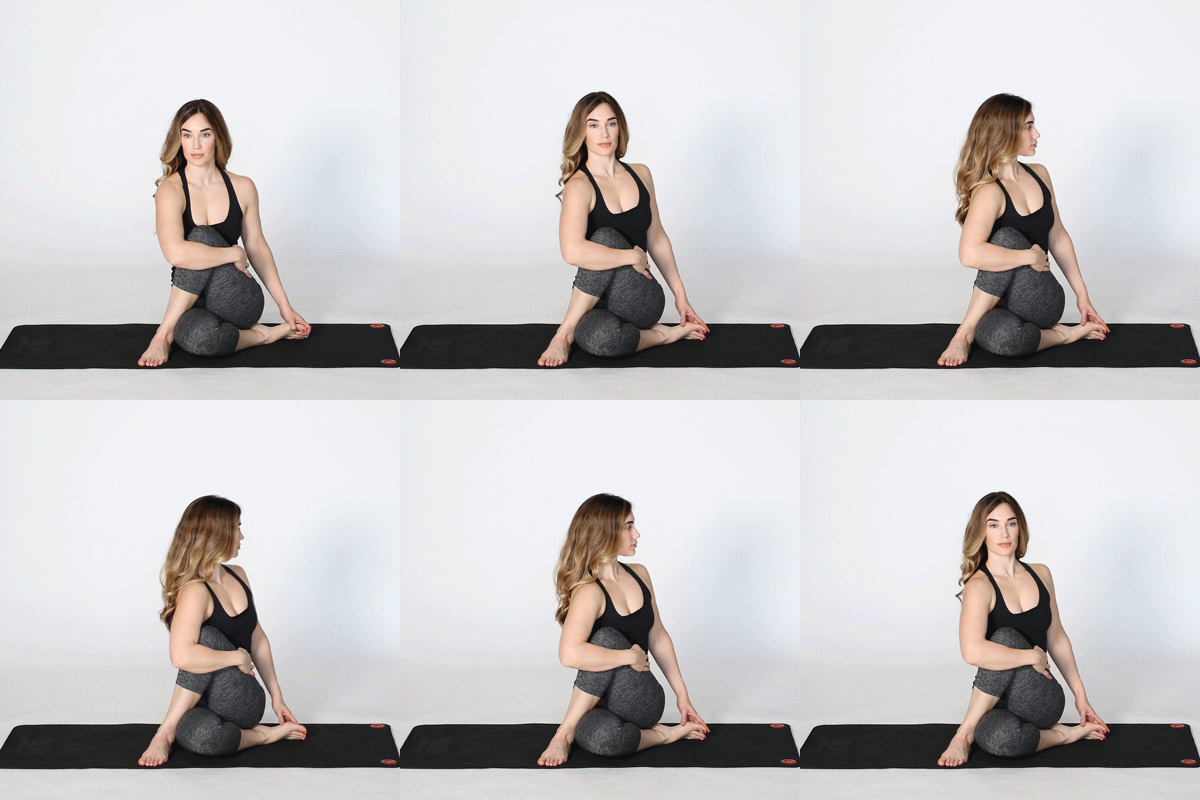
The Half Lord of the Fishes Pose is a twist. It energizes your spine and helps relieve backaches. It stretches your hips, shoulders, and neck. It can also reduce fatigue and aid your organs.
Muscles Worked
When doing the Half Lord of the Fishes Pose, you use many key muscles.
- Rhomboids: Muscles between your shoulder blades.
- Serratus Anterior: Muscles on the side of your ribs.
- Erector Spinae: Muscles along your spine.
- Pectoralis Major: Chest muscles.
- Psoas: Hip flexor muscles.
How to Do the Half Lord of the Fishes Pose
- Start Seated: Begin in a seated position with your legs extended in front of you.
- Position Your Right Foot: Draw your right foot in close to your body, placing it near your left hip.
- Position Your Left Foot: Bring your left foot to the outside of your right leg, placing it flat on the floor.
- Lengthen Your Spine: Sit up tall, lengthening your spine to create space for the twist.
- Twist to the Left: Gently twist your torso to the left.
- Hand Placement: Place your left hand on the floor behind you for support.
- Arm Placement: Move your right upper arm to the outside of your left thigh to deepen the twist. Alternatively, you can wrap your right elbow around your left knee.
- Square Your Hips: Try to keep your hips square and level to deepen the twist in your spine.
- Gaze Direction: Turn your gaze to look over your left shoulder, or whichever feels more comfortable.
- Hold the Pose: Stay in this position for up to 1 minute. Breathe deeply and relax into the twist with each exhale.
- Repeat on the Other Side: Slowly release the twist and return to the starting position. Repeat the pose on the opposite side.
Benefits of Half Lord of the Fishes Pose
This pose helps to stretch and strengthen your back, hips, and shoulders. It can improve your spinal flexibility, relieve tension, and stimulate your digestive organs. Practicing this twist regularly can also enhance your overall energy and reduce fatigue.
Add the Half Lord of the Fishes Pose to your routine. It will give you better spine movement and less back pain. Remember to move gently and listen to your body, especially if you’re new to this pose.
8. Two-Knee Spinal Twist: A Gentle Stretch for Your Spine
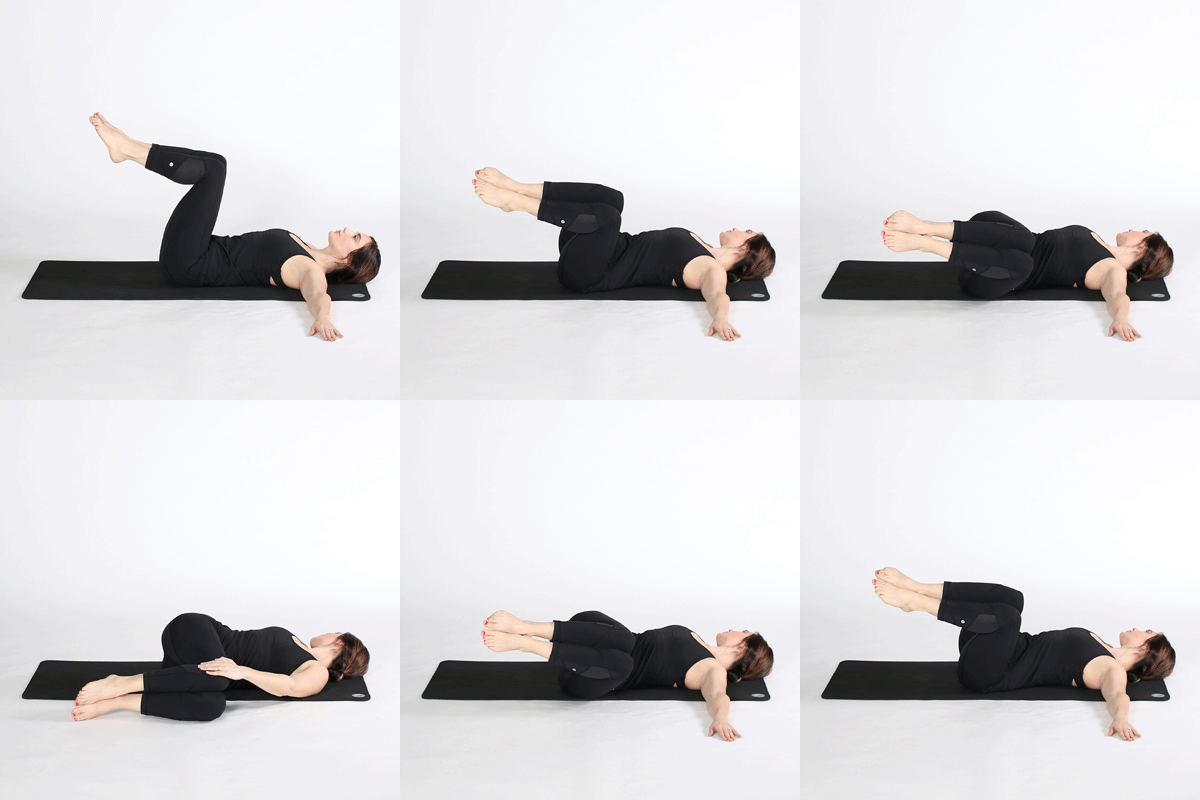
The Two-Knee Spinal Twist is a soothing pose. It helps restore and promote movement and mobility in your spine and back. It stretches your spine, back, and shoulders. It helps to ease pain and stiffness in your back and hips.
Muscles Worked
This pose engages several important muscles, including:
- Erector Spinae: Muscles that run along your spine.
- Rectus Abdominis: Your abdominal muscles.
- Trapezius: Muscles in your upper back and neck.
- Pectoralis Major: Muscles in your chest.
How to Do the Two-Knee Spinal Twist
- Lie on Your Back: Start by lying flat on your back on a comfortable surface, such as a yoga mat.
- Draw Your Knees In: Bring your knees up toward your chest, hugging them gently.
- Extend Your Arms: Extend your arms out to the sides at shoulder height, forming a T shape with your body.
- Lower Your Legs to the Side: Slowly lower your legs to the left side of your body, allowing them to rest on the floor. Try to keep your knees as close together as possible.
- Use a Pillow for Support: If needed, place a pillow under both knees or between them for added comfort and support.
- Press Down Gently: Use your left hand to gently press down on your knees, deepening the stretch.
- Neck Position: Keep your neck in a neutral position, or if it feels comfortable, turn your head to the right. Choose whichever position feels best for you.
- Focus on Your Breath: Take deep, calming breaths. Inhale deeply and exhale slowly, allowing your body to relax further into the stretch.
- Hold the Pose: Stay in this position for at least 30 seconds, or longer if it feels good. Enjoy the gentle stretch and the release of tension in your back.
- Repeat on the Other Side: Slowly bring your knees back to the center, and then lower them to the right side. Repeat the same steps on this side, using your right hand to gently press down on your knees.
Benefits of the Two-Knee Spinal Twist
This pose helps to stretch and lengthen your spine, back, and shoulders. That can ease pain and stiffness. It also promotes better mobility and flexibility in your spine and hips. Regular practice can improve posture. It can also bring a greater sense of relaxation and well-being.
Add the Two-Knee Spinal Twist to your routine. It offers a gentle way to relieve back pain and boost flexibility. Remember to move slowly and listen to your body, especially if you are new to this pose.
9. Child’s Pose: A Relaxing Stretch for Your Body
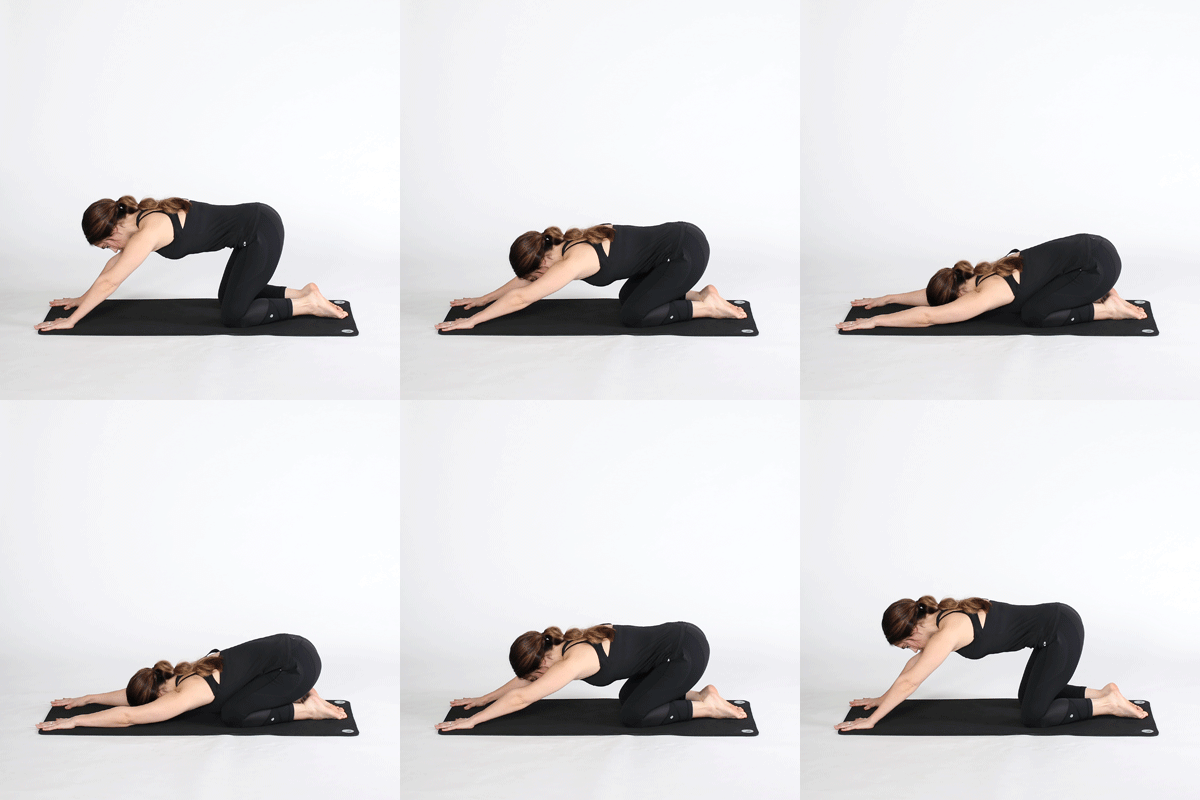
Child’s Pose is a gentle yoga position that helps you unwind and ease tension in your neck and back. It’s a soothing stretch. It elongates and relaxes your spine. It also gives a good stretch to your hips, thighs, and ankles. Doing this pose often can cut stress and tiredness. It will leave you feeling refreshed and calm. Yoga Poses to Prevent Back Pain
Muscles at Work
During Child’s Pose, several important muscles get engaged and stretched:
- Gluteus Maximus: This is the largest muscle in your buttocks, and it helps in hip movement and stability.
- Rotator Cuff Muscles: These muscles support your shoulder joint and help with arm movement.
- Hamstrings: They run along the back of your thighs. They bend your knees and extend your hips.
- Spinal Extensors: These muscles maintain your spine’s curve. They also help with standing and bending.
How to Do Child’s Pose
- Start by sitting back on your heels, keeping your knees close together.
- You can make yourself more comfortable by adding a cushion or folded blanket. Put it under your thighs. You can also put it under your torso or forehead. Yoga Poses to Prevent Back Pain
- Gently bend forward and walk your hands out in front of you on the floor.
- Allow your forehead to rest softly on the ground. Yoga Poses to Prevent Back Pain
- Keep your arms stretched out in front of you. Or, bring them by your body with your palms facing up.
- As you settle into the pose, focus on releasing tension in your back. Allow your upper body to sink towards your knees.
- Stay in this position for up to 5 minutes, breathing deeply and relaxing into the stretch. Yoga Poses to Prevent Back Pain
Tip: If you feel any discomfort, you can adjust by widening your knees or adding support.
Child’s Pose is simple and effective. It helps you unwind and stretch your body. It offers relaxation and relief from daily stress. Add it to your yoga routine. It will calm you and promote well-being.
10. Sphinx Pose: A Gentle Backbend
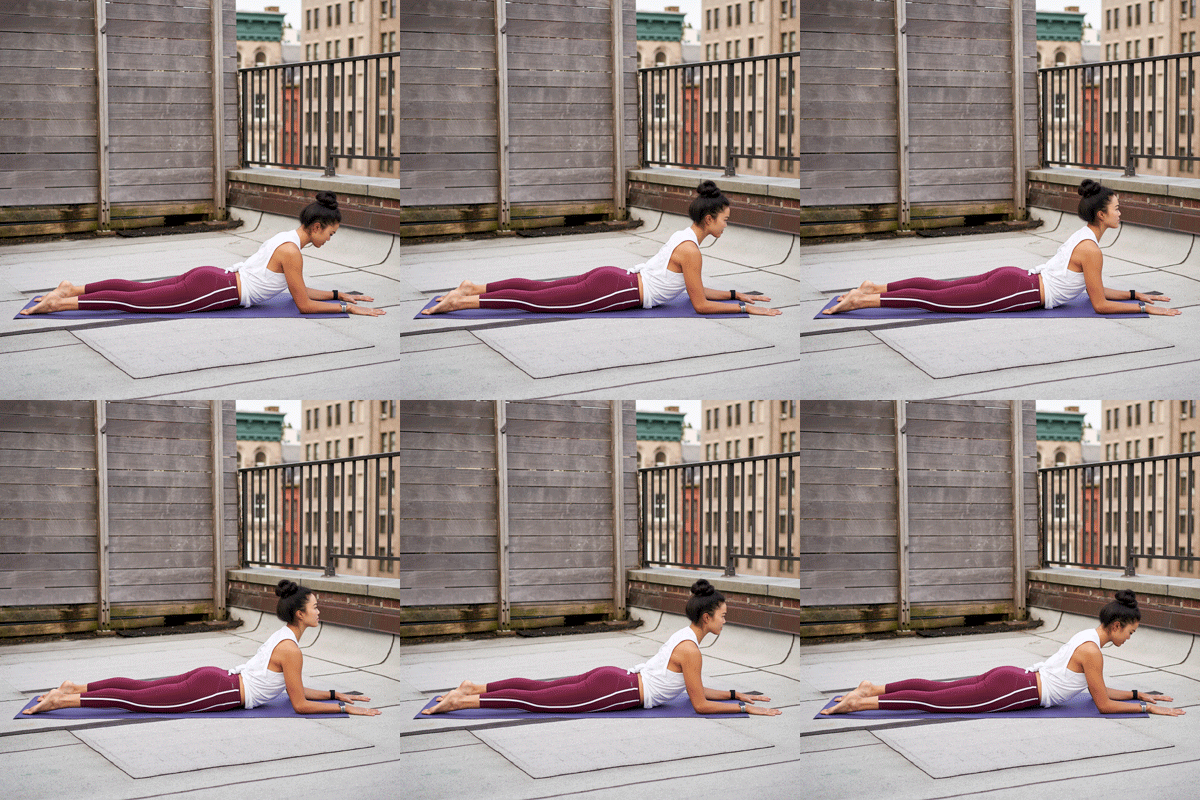
The Sphinx Pose is a gentle yoga posture that helps to strengthen your spine and buttocks. It also stretches your chest, shoulders, and abdomen. This can ease stress and aid relaxation.
Muscles Worked
When you practice the Sphinx Pose, you engage several key muscles, including:
- Erector Spinae: Muscles along your spine that help keep you upright.
- Gluteal Muscles: The muscles in your buttocks.
- Pectoralis Major: The large muscles in your chest.
- Trapezius: Muscles across your upper back and shoulders.
- Latissimus Dorsi: The broad muscles on the sides of your back.
How to Do the Sphinx Pose
- Lie on Your Stomach: Begin by lying face down on your mat with your legs extended straight behind you. Keep your feet about hip-width apart and your toes pointed.
- Engage Your Muscles: Activate the muscles in your lower back, buttocks, and thighs. This helps to support your spine as you move into the pose.
- Position Your Elbows: Bring your elbows directly under your shoulders. Place your forearms on the floor with your palms facing down. Your arms should be parallel to each other.
- Lift Your Upper Body: Slowly lift your upper torso and head off the ground. Press your forearms firmly into the floor to support this lift.
- Engage Your Lower Abdominals: Gently tighten your lower abdominal muscles. This action supports your lower back. It stops you from collapsing into your lumbar spine.
- Lengthen Your Spine: Focus on lengthening through your spine and out through the crown of your head. Imagine your spine growing taller as you lift, rather than bending backward.
- Keep Your Gaze Forward: Look straight ahead, keeping your neck in line with your spine. Avoid tilting your head back or letting it drop forward.
- Relax and Stay Engaged: While in this pose, allow your body to relax as much as possible. At the same time, remain active and engaged through your muscles to support the pose.
- Hold the Pose: Stay in the Sphinx Pose for up to five minutes. Breathe deeply and evenly. Focus on the gentle stretch and the engagement of your muscles.
Benefits of Sphinx Pose
Practicing the Sphinx Pose can strengthen your spine and buttocks. It also stretches your chest, shoulders, and abdomen. This pose can also help reduce stress and promote a sense of relaxation and well-being.
Enjoy the calming effects of the Sphinx Pose as it gently works your body and helps you find balance and ease.

